Creating a Declare Label Start to Finish
Declare Labels make a powerful statement on visibility and transparency for consumers, and are easily configured, generated, and submitted to the Living Future from product information input into 3E Exchange. This guide walks you through each step of the workflow within 3E Exchange, so you may enjoy a streamlined experience as you create a new Declare label.
Initiating the Declare Label Workflow
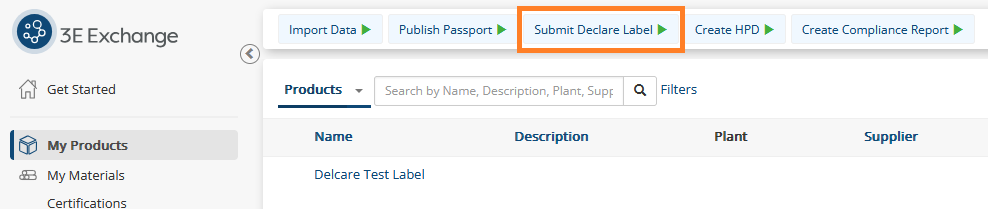
You will start by selecting the button at the top of your screen that says Submit Declare Label. This will trigger the step-by-step workflow built into 3E Exchange.
After beginning the workflow, you will be prompted to import a new product or select an existing product from My Products.
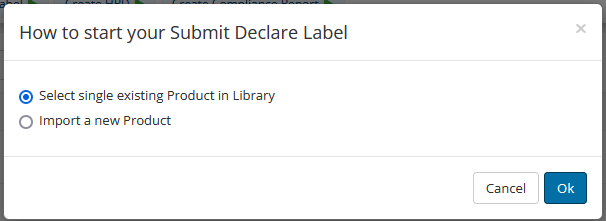
If the product you are looking to submit to Living Future as a Declare label is not in My Products, select Import a new Product, and follow the steps provided in Preparing Your Bill of Materials in 3E Exchange guide.
If the product is already in My Products, select Select single existing Product in Library. 3E Exchange will prompt you to select the product you wish to submit for a Declare label from those you’ve created in My Products. Once the product has been selected, the Submit Declare Label workflow will begin.
Step 1: Review Bill of Materials (BOM)
Once you've either imported your data OR selected an existing product, you will find yourself on the Review BOM step of the workflow.

In this step, please ensure your BOM is fulfilling the Declare requirements. When submitting a Declare label, 3E Exchange cross-references the Chemical Registry Number provided within the BOM against Living Future’s Red List. When the Declare label is published, the Chemical Registry Number, Chemical Name, and Product % by Weight appear with the label on the Declare Database. A Declare submission requires data to be present in each of the aforementioned fields for the reported product to be disclosed properly.
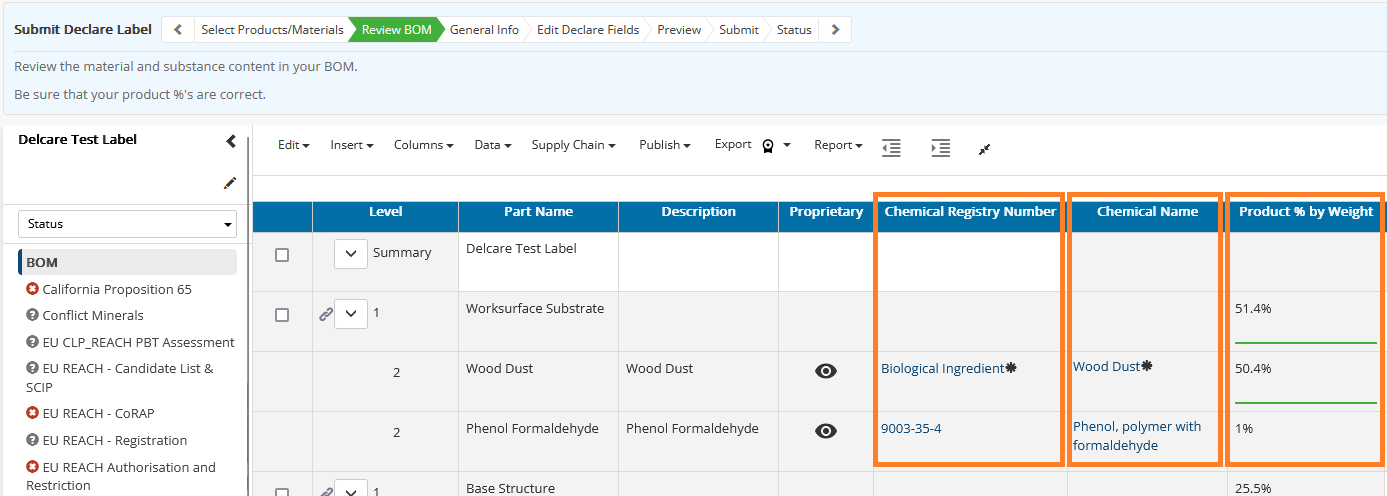
Declare also requires all intentionally added ingredients down to 100 ppm (0.01% of the Product % by Weight) to be disclosed. If you’re inputting the weights of each ingredient in the Weight category, then 3E Exchange will automatically calculate and populate the Product % by Weight field. If you are filling in the Product % by Weight field manually, you will need to ensure that the combined total adds up to 100%.
Once you've confirmed that your BOM is correct and complete, select the arrow to move on to the next step in the workflow.
Step 2: Complete Declare Specific Manufacturer Information
In the General Info step, you will be given the chance to fill in detailed Manufacturer Info, the Product Description, and provide a company logo and product image.

At a minimum, the Manufacturer Name and General Description fields must be completed as part of your Declare submission.
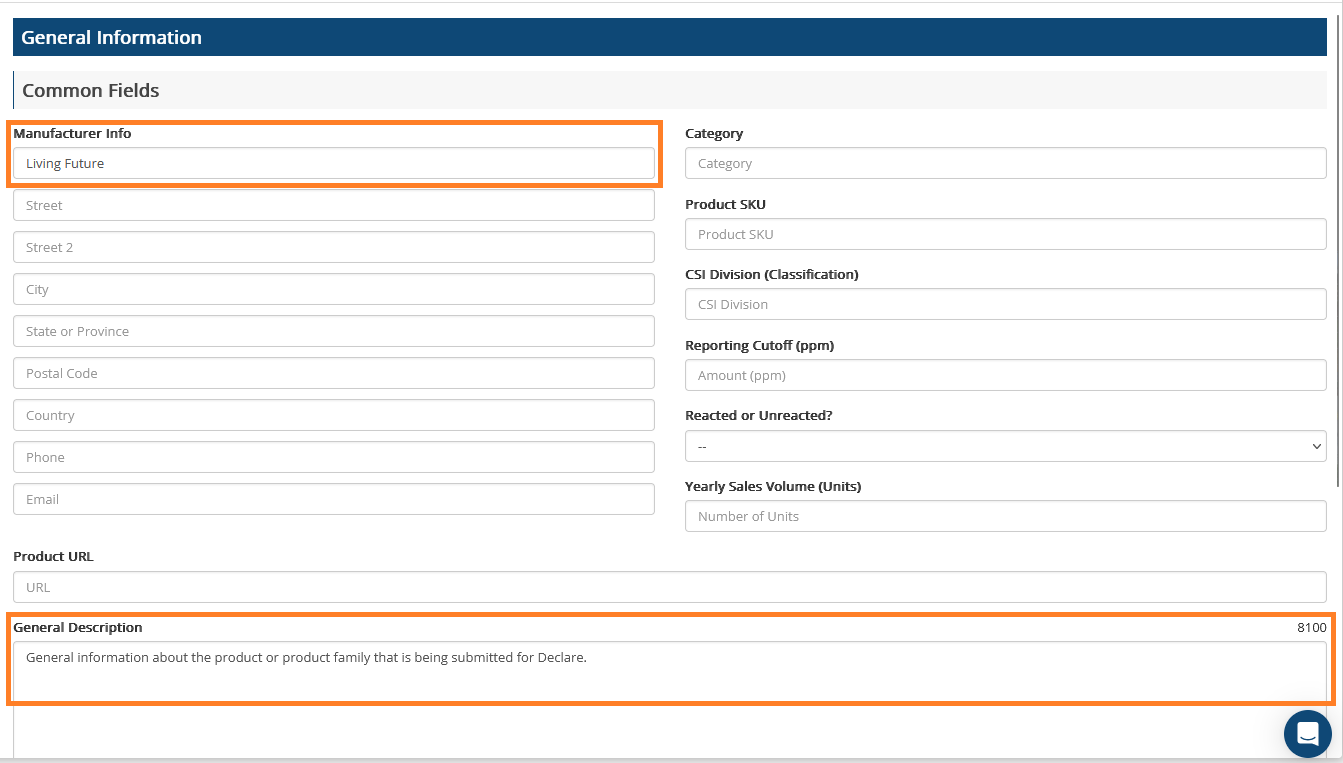
The Manufacturer Name will appear just below the product’s name on the Declare label. The Manufacturer Name is also identified as a filter option in the Declare database once the label is published. Therefore, it is recommended that you ensure all Declare submissions contain identical information in the Manufacturer Name field.
The General Description is meant to describe the product, products, or product family covered under the Declare label. The General Description does not appear on the Declare label, but it does appear on the Declare database. Additionally, the search function on the Declare database searches for keywords from this field as well as the Product Name and Manufacturer Name.
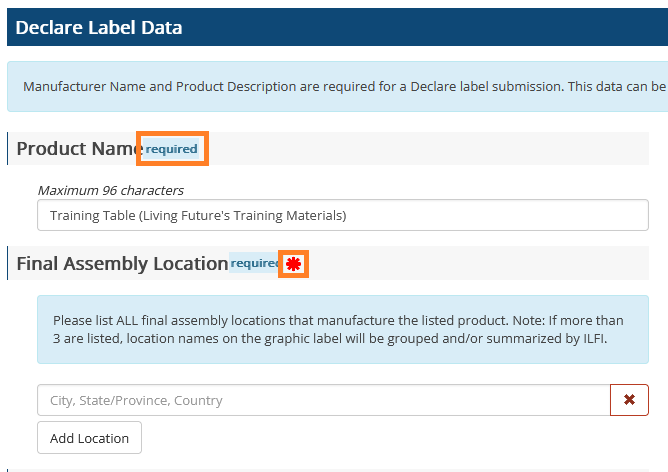
Step 3: Fill in Declare Label Data
In the Edit Declare Fields step, the data that is input is predominantly used to fill out your Declare label.

Within this page, there are a series of required and optional fields specifically designed for the Declare label. All required fields will have a required indication next to them. Any field that still needs to be filled out will have a red asterisk next to them to help you identify missing information.
Once you’ve filled in all the required fields and any optional fields you’d like to opt into, moving forward through the workflow will prompt you to determine if the label should be generated using Just Substances or Materials and Substances.
If you’d like your label to only list the ingredients from most prevalent to least prevalent within the product, select Just Substances.

If you’d like your label to include the components that make up your product and indicate which ingredients are included in each component, select Materials and Substances. For this to function properly, your bill of materials must utilize the Levels field and the Material % by Weight field within the BOM.
Step 4: Preview, Exceptions, and Omissions
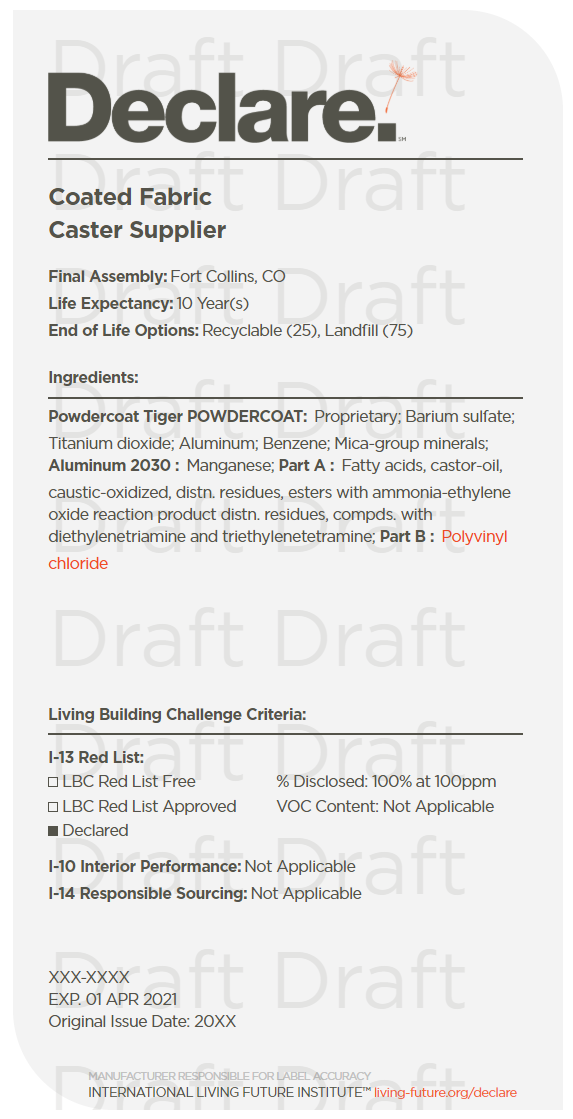
After selecting how you’d like to report the ingredients for your label, you will be taken to the Preview step where a draft of your label will be generated (similar to the example label above).
Below the draft label, you’ll be able to perform a final review of each ingredient listed on the label. There, you will have the ability to edit the chemical name, apply exceptions, and opt to omit an ingredient.
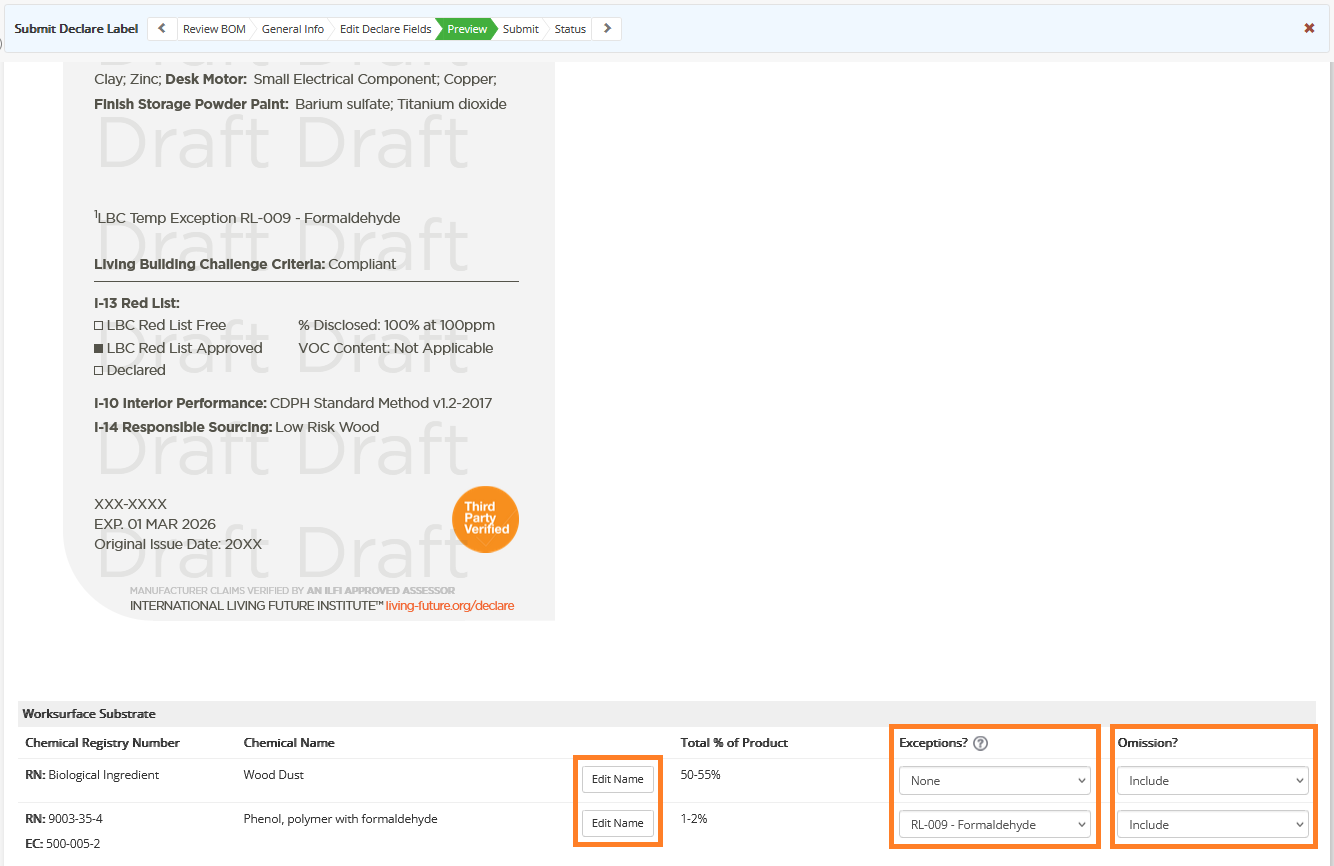
By selecting Edit Name you are able to change the Chemical Name. This is handy for custom ingredients or to update the chemical to a common name instead of the chemical composition. As part of Living Future’s review of the label, the team will confirm the accuracy of ingredient names to chemical registry numbers. If the team determines that the modified chemical name is not appropriate, you will be asked to edit it and resubmit the label with updates.
If you believe an exception applies to one or more of your ingredients, you can select the applicable exception from the drop-down menu for all ingredients that apply to that exception. The Living Future team will determine if the indicated exception applies. If it does not, then changes may impact your label’s declaration status.
All ingredients should be included in the Declare submission. Therefore, the omission section should always be listed as Include. The only time an ingredient should not be reported on a Declare submission and label is for ingredients that fall below 100 ppm. If you wish to omit an ingredient because it is proprietary, please select the eyeball symbol in the BOM step. This will also apply the Proprietary Ingredient Exception to that ingredient.

Step 5: Submit Your Declare Label
Once you have confirmed all of the information for your Declare label - congratulations - you are ready to submit your label to Living Future for approval! Select the next button to start the submission workflow. All the steps after that for submission, review, approval, and publishing are available in our next article: “Declare Submission, Review, and Publication Process.”
Choosing to submit your data will send a summary of your Declare label to the Living Future team for review, including your name and email address registered in 3E Exchange. Data you have marked as proprietary will remain undisclosed in this submission.
The Living Future team will review your submission and will be in contact with you if there are any questions or concerns about the information provided.
Getting Help
If you have questions about the Declare label process and information, contact declare.support@living-future.org. Declare office hours are also available every other Thursday at 1pm Eastern Time for live, virtual support.
If you have questions about using 3E Exchange, reach out in chat in the bottom right-hand corner or email support@3eco.com.