
Geofund + Declare: Introduction to the Geofund Platform
Welcome to Geofund, a sustainability traceability platform, and the home for Declare label creation, submission, and support. Geofund is an industry-agnostic supply chain traceability platform that provides scalable data management, collection, validation, and digital exchange across sustainability standards. And Declare Labels make a powerful statement on visibility and transparency for consumers. This partnership streamlines the Declare process so that labels are easily configured, generated, and submitted to Living Future from product information input into Geofund.
This guide walks you through each step of the workflow within Geofund, so you may enjoy a streamlined experience as you create a new Declare label or renew one.
Logging Into Geofund
The Geofund platform tracks organizations or companies as the primary body from which a Declare label is submitted and to accurately determine pricing. When the organization account has been created, a member of your team will be given the role of Admin. The Admin or another member of your team must have an active Living Future Professional Membership in order to submit Declare labels. Once the organization account is created, the individual with the Admin role will be able to invite additional team members to prepare and submit Declare labels on behalf of that organization and/or its subsidiaries.
If your organization does not yet have a Geofund account, you will be asked to fill out a Geofund Registration Form. This form allows the Living Future team to create your account and then issue the initial sign-in link.
Please keep an eye out for an upcoming guide that will detail account and user management. At this time, that guide is not yet developed.
Navigating Geofund
Now that you are logged into Geofund, you will start on the Labels landing page. This is the primary page where you can view your labels, identify the current workflow status of each label, and quickly download PNG labels of published labels.

- Labels: This section of the sidebar menu acts as the primary landing page. All Declare labels that have been submitted, drafted, published, and otherwise will be housed within this section. There are additional functions and utility to the other sections within this sidebar, but details on those features will be covered in later articles.
- Notifications: After Declare labels are submitted or if you have questions about a draft label you’re preparing, comments can be made in specific sections so that Living Future can efficiently coordinate with you on your labels. The notification bell in the top right corner of the screen indicates that you have comments waiting. Comments directed at you will also be sent to your email, so you won’t have to remain logged into Geofund at all hours.
- New Label: The New Label button will be the button to select when you’re ready to create a new label. We’ll go through the workflow upon clicking this button later in this article.
- Search Bar: If you’re looking for a specific label housed under your account, and you can’t quickly identify it, the search bar allows you to search for it promptly.
- Filter Buttons: These filters are made to allow you to quickly identify labels based on their Status. Simply selecting the publication status you want will filter out all labels except those with the status you’re looking for.
- Label List: If the All filter is selected, all of your Declare labels no matter the status will be housed in this section. Here, you can see the Label Name, the publication Status, when it was Last Modified, as well as Actions, such as downloading a draft or published Declare label.
Comments in Geofund
Selecting the notification bell opens a sidebar menu on the right side of your screen. This lists all comments made on your label. Selecting on the comment will bring you to the label with the comment on it.
Once within the label, look for the blue comment symbol. A blue comment symbol indicates that there are pending comments in that section. Clicking the symbol will open a sidebar displaying all comments associated with that specific section, along with the details of each comment. The Unresolved status indicates comments that require attention from the manufacturer or the individual who has been tagged. After reviewing the comment, you can address it immediately in the section that had the comment, adjusting what was needed, or you can reply directly to the commenter for additional support or clarification.

If you’ve addressed the concern raised in the comment, you can select Resolve, and the commenter will be notified that the comment has been addressed.
If you’d like to request support or provide clarification on the comment, you can select Reply and write up the comment.
When replying to comments, be sure to tag the user you’re looking to connect with. In the example above, you can see Forest tagged Chelsea by inserting the @ symbol before Chelsea’s name. This will ensure notifications are sent to the appropriate users.
If you’re looking to comment on a specific section, you can select the gray comment symbol. The gray symbol indicates that there are no unresolved comments in that section. You can also select it to make comments yourself.

At the bottom of the sidebar menu that pops up on the right-hand side, you can input your comment and then select the Comment button to have it posted to that section on your label.
As mentioned earlier, when making a comment, be sure to tag the user you’re looking to connect with. If you’re unsure who to tag, you can tag Declare Support.
Initiating the Declare Label Workflow
Whether renewing or creating a new Declare label, everyone must go through the Declare workflow to ensure all information is input accurately. You will initiate the workflow by selecting the label you’d like to work on or by selecting + New Label. This will take you into the main tab of the label where you’ll begin by reviewing and inputting product and manufacturer information within the Product tab.
Workflow Step 1: Product Tab
Within the Product tab and within the Product Details box, you’ll be required to input a Product Name and at least one Final Assembly Location. You may also upload a Product Image, provide a Product Description and input a link to the product under Add Product Website. Required fields are marked with a red asterisk.

The Product Image file can have an image file format of png, jpeg, and jgp with a max size of 50MB.
The Product Name is one of the two required fields. It is the name that will appear on the Declare label and in the Declare Database.
The Product Description will not appear on the Declare label, but it will appear in the product’s page on the Declare Database.
The Add Product Website field allows you to input a direct link to the product on your organization’s site. This will not appear on the label, but it will appear on the Declare Database.
Finally, to add a Final Assembly Location, select + Add Assembly Location. This will open a new box where you can enter the address of the final assembly location or just the city.

When you begin adding a location, autofill options will appear below the Address box. You must select the drop down option for the location to stick when preparing your label. You are not required to input an exact address, but Declare does require the City, State and/or Province, and Country for the Final Assembly Location to be approved.
If there are multiple Final Assembly Locations, once you’ve filled in the first, select + Add Assembly Location again for the next location box to appear. Repeat this process for all Final Assembly Locations for the product.
Next, within the Product tab, locate the Manufacturer Info box. You’ll primarily be verifying the information in these fields, which will be automatically populated from your account settings. Importantly, any information entered into the Manufacturer Info box will appear publicly as the product inquiry contact on the Declare Database listing.

The Name (company name) will appear on the Declare label header. As this field pulls directly from your account settings, it’s recommended that you update the settings themselves to ensure alignment across all labels. However, if this product is part of a different brand under a parent company (the account holder), it is recommended that these fields be updated to reflect the appropriate brand.
The Address, Phone, Email, and Website are all public-facing and available on the Declare Database listing once the label is published. It is recommended that all data input in these fields avoid the use of personal contact information.
Before moving on to the next step, be sure to select Save in the top right corner of the page. This will ensure all data is not lost between tabs. But don’t worry, if you forget to save, a pop up warning will appear notifying you that you have unsaved data. Select Stay to return to the page and save your work.

Workflow Step 2: Declare Tab
Within the Declare tab, you will be asked to input information specific to the product(s) as a whole. These are details such as Life Expectancy, End of Life Options, Embodied Carbon reporting, and more. The following section will detail each data point. For more details about what is reported and why, please look to the General Product Information Reported section of the Declare 2.1 Manufacturer’s Guide.
Within Declare Details, the two sections that will need to be filled in are CSI MasterFormat and Life Expectancy. When selecting CSI MasterFormat, you can type in the specific CSI division or scroll through the list. The CSI MasterFormat will not appear on the Declare label, but it will act as a filter option on the Declare Database. Under Life Expectancy (Years), simply input the number of years that the product is expected to remain usable. There is no need to include “years” after the number, as this will automatically be added to the Declare label. Life Expectancy will appear both on the Declare label and the Declare Database.
If you do not know the life expectancy, you may input the warranty value. If the product is intended to remain in use for the life of the building, you may input “Life of the Building.”

Within Embodied Carbon Data, you have the option to report your product’s global warming potential (GWP) if it has a Life Cycle Assessment (LCA) or Environmental Product Declaration (EPD). To report this data, select the check box next to “Has an LCA or EPD been completed for this product?” This will prompt you to add additional data required if you wish to report the embodied carbon information. You will need to indicate the GWP (kg CO2 eq) and Declared Unit as they are presented in your LCA or EPD. You will also need to upload or provide a link to the corresponding LCA or EPD. The embodied carbon data will appear on both the Declare label and the Declare Database, while the link to the LCA or EPD will only appear on the database.
For details on the requirements for Embodied Carbon Reporting, please refer to the Declare Manufacturer’s Guide (linked).

In the section labeled "VOC Content in Wet-Applied Products," first determine whether the product meets the definition of a site-installed, wet-applied product. If the product is not wet-applied, this section can be skipped. For wet-applied products, check the box asking, “Is this a site installed, wet applied product (interior or exterior application)?” You will be presented with two additional fields that will need to be filled in: VOC Content (g/L) and What is your wet-applied product category? For the VOC Content (g/L), there is no need to include “g/L” after the number, as this will automatically be added to the Declare label and database. . If this section is not filled in, it will simply read “Not Applicable.”

In the VOC Emissions section, if your product is an interior product with the potential to emit, you will need to select the box indicating that this is the case. If your product does not have the potential to emit and/or is not defined as an interior product, you can skip this section.
After checking the box, additional information will be requested. You will be asked if the product has demonstrated compliance with one of Declare’s accepted emissions standards. If you select the box, you will then be asked which standard your product aligns with. Select the text box and choose one of the options from the dropdown menu.
You will also be asked to provide a certificate or summary document from an accredited lab. This information will appear on the Declare label and in the Declare database. If your product does not require this information to be disclosed, this section will read “Not Applicable” on the label. If the product has the potential to emit and is an interior product but has not demonstrated compliance, the section will indicate “Not Compliant”.
When uploading VOC emissions compliance or summary documents, please ensure that they are up to date and active.

In the Responsible Sourcing section, you will be asked if your product contains wood. If it does, check the box in that section. You will then be asked to indicate the sourcing compliance in accordance with Imperative 14: Responsible Sourcing, of the Living Building Challenge. If the wood in your product is not sourced through one of the allowed options, select Not Compliant. Otherwise, select the method in which your product meets the responsible sourcing requirements.
Please note that if your product is available with FSC Chain of Custody, you will also be asked to upload the chain of custody certificate. Please be sure the certificate is up to date and active.

The EU Chemicals of Concern Display is an optional section. If the box is checked, any ingredients present on the label that are on the EU REACH List and/or ChemSec SIN List will be flagged. This will not impact your label’s Declaration Status.
Please note that the ingredients in your bill of materials will already be screened against regulatory lists such as REACH or SIN. This section allows you to display the results of that screening on your label.
If your product includes recycled content, and you’d like to showcase that on your label, you may check the box under % Recycling. You will then be asked to provide additional information about the recycled content within your product.
This section is optional.
If you would like to display how much of your product has been chemically assessed on the Declare website, you may check the box in the Chemical Hazard Assessment Coverage % section. You will also need to upload your chemical health assessment ingredient list for the Living Future team to review.
This section is optional.
In the Warranty section, you may check the box if your product has a warranty available. Doing so will prompt you to upload your warranty documentation or indicate the number of years the warranty is available.
This section is optional.
The last portion of the Declare tab that you will need to fill out is the Product End-of-Life & Circularity Pathway Selection. At least one of the pathways must be selected for the label to proceed to publication. There are eleven pathway options available that are fully detailed in the Declare 2.1 Manufacturer’s Guide. To begin, simply check the box for each pathway that applies to your product.

When you select an applicable pathway, additional fields will populate with information required for that pathway. These may include the scope of the product, details about which components fall within the selected pathway, the estimated percentage by weight of the product that falls within the pathway, and more. Each field that appears when a pathway is selected must be filled in for the label to proceed to publication.

A full guide detailing the changes with Declare 2.1 and the updates to the End-of-Life & Circularity Pathways will be available at a later date.
Workflow Step 3: Variant Tab:
The Variants tab acts as the Bill of Materials (BOM) upload section for Declare label submissions. When you first enter this tab, you will be met with a drop-down box listed simply as Default. Open up this box and then fill out the text cells. The required fields are the Name, Total Weight, and UOM (unit of measurement). You may also indicate if the product is reported using static figures or a range.
The Product URL and Product Codes fields are optional.

If you do not know the actual total weight, you may input 1 with any UOM you choose. The system will calculate the rest and provide the product percent by weight for each ingredient.
Once you have filled in the required fields, select Save. A new box will appear with an option to upload a CSV or XLSX file. The formatting of the file must meet the system’s needs, so you must select Download Template to download the BOM template file. Within that file, you can then fill out your BOM.
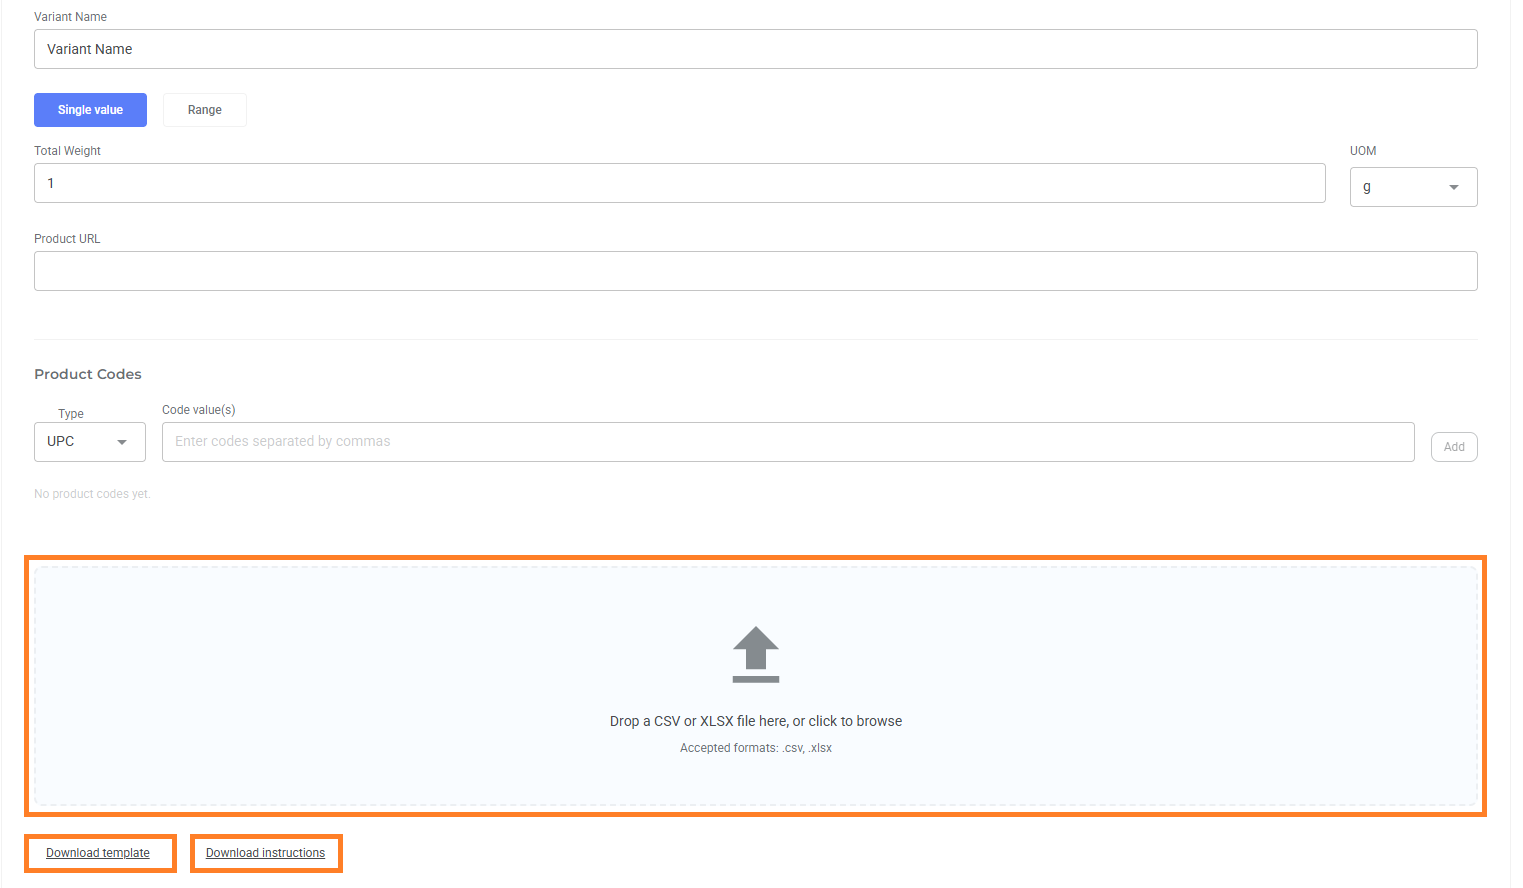
Instructions on filling out the BOM template are also available by selecting Download Instructions. These instructions will outline formatting requirements within the BOM Template.
Alternatively, you may select + New, which will give you the option to add components and ingredients individually, or import an existing component or substance from your library.
The Living Future team will issue guidance on utilizing the Library at a later date.

Once you have your BOM in the platform, you can ensure all the data required by the Declare program is included and accurate. Primarily, Living Future requires an accurate Chemical Name, data of some kind under CASRN, and a Product % by Weight that totals 100%.
If you need to make edits to specific ingredients within the BOM, you can select the three vertical dots on the right side of the ingredient in question. Then select Edit Row to edit the specific ingredient. You can also delete rows, add rows (ingredients or components), and add sub-components by selecting the three vertical dots.

When editing a row, a pop-up window will appear. Within this window, you can:
- Edit the Ingredient Name
- Edit the Parent Component
- Edit the CASRN
- Edit the Chemical Name
- Mark the ingredient as proprietary
- Indicate if the ingredient meets a Special CASRN Requirement
- Apply an Exception
- Update the weights
- Add a Description
- Apply Rounding rules
- Edit the Part Name
- Select a Supplier

If you edit the CASRN, the Chemical Name will update as well, either linking the corresponding ingredient name or erasing any existing data in that field. If you edit the Chemical Name, the same applies to the CASRN field.
If your ingredient does not have a CASRN and meets one of the Special CASRN Reporting Requirements, you may add a custom CASRN and Chemical Name in accordance with the rules outlined in the Declare Manufacturer’s Guide.
After making any edits, ensure that you select Save before closing out the window.
Once you’ve completed the BOM, ensured all data is accurate, and ensured the total Product % by Weight sums correctly, you’re ready to move on to the next step.
Workflow Step 4: Product Roll-Up, Files, and Notes Tabs
If you have uploaded multiple BOMs under the Variants tab, the Product Roll-Up tab provides a breakdown of all the ingredients of all variants. This section ensures that all products disclosed on the label using multiple BOMs meet the criteria outlined in the Ingredient Information Reported section of the Declare Manufacturer’s Guide.
The Files tab allows you to upload any additional files that may support the Declare submission.
The Notes tab allows users and reviewers to add any pertinent information about your Declare submission to the platform.
These three tabs will not require a significant amount of your attention; however, you may be asked to provide additional files, or the Living Future team may add notes regarding aligned expiration dates, as examples.
Workflow Step 5: Summary Tab
Once you have entered all the data required for your Declare submission, you will arrive in the Summary tab. This tab gives you a full breakdown of all the data entered for your product(s) reported on the Declare label.
It is highly recommended by the Living Future team to thoroughly review this section to ensure all fields are filled in accurately and to your satisfaction. If one of the fields is empty, it will be filled with a “–” within the Summary tab.
In addition to a summary of all the data input for your label, you will also see a preview of your drafted Declare label.

This will give you a brief glimpse of what your label will resemble once it is published. As a reminder, you can find a detailed explanation of the Declare label format in Reading the Declare Label in the Declare 2.1 Manufacturer’s Guide.
At the bottom of the Summary tab, you’ll be able to find a summary bill of materials.

The summary BOM is a rolled up version of all variant BOMs you’ve included with your Declare label. It will indicate the Component and each Substance listed under that Component. It will also include the Chemical Name and CASRN for each Substance.
The Geofund platform has the BOM reporting settings defaulted to report Substances Only. If you would like to report your BOM with Components + Substances or where only some components are listed (such as when reporting metal alloys), you can select the drop down under Display Options beside each Component. If you would like that component to be reported on the Declare label with both the component and each substance listed below that component, select Components + Substances from the drop down.
Please note that if you’d like the entire label to be reported using Components + Substances, you will need to indicate that beside each component.
Once you are satisfied with the data and its presentation within the Summary tab, scroll to the bottom of the summary BOM. Here, you can now submit your Declare label by selecting the Submit for Review button.

After you submit your label, you only have a few more steps. You’ll be asked if you are pursuing Third Party Verification and if you are working with the Living Future Oceania team. Then you will need to read the Declare Terms and Conditions and check the box indicating that you have read and agree to the terms and conditions.
With that done, you’ll be able to proceed to payment.
Congratulations! You have now successfully submitted your Declare label within Geofund. Please be on the look out for more guides in the coming months with additional details and breakdowns of the features within Geofund.
Getting Help
If you have questions about the Declare label process and information, contact declare.support@living-future.org. Declare also hosts regular office hours; sign up here.